Welcome viewers. Unfortunately I do not maintain this “https://mahidulsblog.wordpress.com” site anymore. But the good news is, I have moved this site to a new domain “http://ourhat.com” which is a huge collection of IT resources. Hope you will like it. Thank you.
How to Install locate package in RedHat 6
How to Install locate package in RedHat 6
Check whether locate or slocate or mlocate RPM is installed in your machine.
[root@app2 ~]# rpm -qa| grep -i locate
If its not installed then search for the locate package from yum repository.
[root@app2 ~]# yum search locate
=============================== Matched: locate ================================
mlocate.x86_64 : An utility for finding files by name
Now install the locate package. In old version it may be slocate.
[root@app2 ~]# yum install mlocate
[root@app2 ~]# locate testfile
locate: can not stat () `/var/lib/mlocate/mlocate.db’: No such file or directory
To resolve the database update issue we need to update database manually. Though cronjob would create it after a restart.
[root@app2 ~]# updatedb
Now you should be able to use locate command in redhat 6.04 or centos 6.04.
Troubleshooting some nagios error
Troubleshooting Experience:
Troubleshooting some Nagios error:
Troubleshooting some Nagios error:
Recently I was trying to deploy nagios to a RedHat 6 Server which I am use to deploy it in debian box. And as usual I found many problems in the installation procedure. One of the unusal thing is that I use latest nagios 3.5 and it does not have statusmap.cgi file and have some dependency issue. It gave me a hard time to solve the issue :D. So, This is how I fixed those problems-
1. snmp plugin fails due to perl dependency:
Error: Can’t locate Net/SNMP.pm in @INC (@INC contains: /usr/local/lib64/perl5 /usr/local/share/perl5 /usr/lib64/perl5/vendor_perl /usr/share/perl5/vendor_perl /usr/lib64/perl5 /usr/share/perl5 .) at ./check_snmp_storage.pl line 15. BEGIN failed–compilation aborted at ./check_snmp_storage.pl line 15.
Solution:
To solve the problem we need to install perl-Net-SNMP which we can implement by following two ways:
Install from rpm:
[root@centoshost01 ~]# wget http://dl.fedoraproject.org/pub/epel/6/x86_64/perl-Net-SNMP-5.2.0-4.el6.noarch.rpm
[root@centoshost01 ~]# wget http://dl.fedoraproject.org/pub/epel/6/x86_64/perl-Crypt-DES-2.05-9.el6.x86_64.rpm
[root@centoshost01 ~]# rpm -ivh perl-Net-SNMP-5.2.0-4.el6.noarch.rpm
[root@centoshost01 ~]# rpm -ivh perl-Crypt-DES-2.05-9.el6.x86_64.rpm
Or
Install from yum:
[root@centoshost01 ~]# vim /etc/yum.repos.d/perl.repo
[Perl]
name=Perl Client
baseurl=http://dl.fedoraproject.org/pub/epel/6/x86_64/
enabled=1
gpgcheck=0
[root@centoshost01 ~]# yum list
[root@centoshost01 ~]# yum install perl-Net-SNMP
2. Error: “Nagios HTTP WARNING: HTTP/1.1 403 Forbidden” shows from the nagios web panel.
Solution:
[root@app1 ~]# vim /var/www/html/index.html
This is local app1 server.
[root@app1 ~]# service httpd restart
3. Error: Not Found – The requested URL /nagios/cgi-bin/statusmap.cgi was not found on this server.
Solution:
This problem happens with the new nagios version 3.5. First check the /usr/local/nagios/sbin folder if it contains the statusmap.cgi file. If not copy the file from the untar nagios folder to /usr/local/nagios/sbin. If nagios 3.5 does not have the statusmap.cgi then download the nagios 3.4.1 and copy the statusmap.cgi to your /usr/local/nagios/sbin location. If still not showing the map from nagios then follow the below steps-
[root@centoshost01 ~]# yum install gd gd-devel
or install it from rpm,
# Download and install gd which is a graphics library for quick creation of PNG or JPEG images
[root@centoshost01 ~]# yum remove gd
[root@centoshost01 ~]# wget http://rpm.pbone.net/index.php3/stat/4/idpl/15161687/dir/redhat_el_6/com/libgd2-2.0.33-2_11.el6.x86_64.rpm.html && wget ftp://ftp.pbone.net/mirror/atrpms.net/sl6-x86_64/atrpms/testing/gd-devel-2.0.33-2_11.el6.x86_64.rpm && wget http://dl.atrpms.net/el6-x86_64/atrpms/testing/gd-2.0.33-2_11.el6.x86_64.rpm
[root@centoshost01 ~]# rpm -ivh libgd2-2.0.33-2_11.el6.x86_64.rpm
[root@centoshost01 ~]# rpm -ivh gd-2.0.33-2_11.el6.x86_64.rpm
[root@centoshost01 ~]# rpm -ivh gd-devel-2.0.33-2_11.el6.x86_64.rpm
[root@centoshost01 ~]# cd /nagios-3.4.1/
[root@centoshost01 ~]# ./configure -with-gd-lib=/usr/local/lib/
[root@centoshost01 ~]# make cgis
[root@centoshost01 ~]# cp /nagios-3.4.1/cgi/*.cgi /usr/local/nagios/sbin
[root@centoshost01 ~]# chown nagios:nagios /usr/local/nagios/sbin/*.cgi
syslog location in Redhat 6
P { margin-bottom: 0.08in; }
Troubleshooting Experience:
What is syslog?
– Syslog keeps all the error report of the system. It is extremely necessary for the system administrators to monitor the system status to find out/ troubleshoot any system related issue.
Where is the syslog location in Redhat 6?
– Silly question. But amazingly I didn’t find any syslog location in redhat. After some googling I find out that by defaults syslog is not enabled in redhat. We need to enable it manually for the first time. And this is how I did it:
First check that sysconfig package in installed to your system:
[root@mahidul ~]# rpm -qa | grep syslog
rsyslog-gssapi-4.6.2-12.el6.x86_64
rsyslog-mysql-4.6.2-12.el6.x86_64
rsyslog-relp-4.6.2-12.el6.x86_64
rsyslog-4.6.2-12.el6.x86_64
rsyslog-gnutls-4.6.2-12.el6.x86_64
sblim-cmpi-syslog-0.8.0-1.el6.x86_64
rsyslog-pgsql-4.6.2-12.el6.x86_64
If its not installed by default then install it like this way:
[root@mahidul ~]# yum install -y rsyslog
Check the syslog status:
[root@mahidul ~]# service rsyslog status
Restart the service:
[root@mahidul ~]# service rsyslog restart
Start syslog after every time system restart:
[root@mahidul ~]# chkconfig rsyslog on
Optional, If you try to change/customize the syslog settings edit the below location:
[root@mahidul ~]# vim /etc/rsyslog.conf
At last check the syslog:
[root@mahidul ~]# tail -f /var/log/messages
How to enable port forwarding in debian 7 wheezy
Basic Static Routing Part #1 (Port forwarding)
My network diagram:
 Here host#1 is our gateway server. And host#2, host#3 are workstations. Lets, Set ip addresses to the interfaces at host#1,
root@host1:~# nano /etc/network/interfaces
# The loopback network interface
auto lo
iface lo inet loopback
# The primary network interface
auto eth1
allow-hotplug eth1
iface eth1 inet static
address 192.168.1.11
netmask 255.255.255.0
gateway 192.168.1.1
auto eth2
allow-hotplug eth2
iface eth2 inet static
address 10.1.0.1
netmask 255.255.255.0
auto eth3
allow-hotplug eth3
iface eth3 inet static
address 172.16.1.1
netmask 255.255.255.0
Set ip an address to the interfaces at host#2,
root@host2:~# nano /etc/network/interfaces
# The loopback network interface
auto lo
iface lo inet loopback
# The primary network interface
auto eth4
allow-hotplug eth4
iface eth4 inet static
address 10.1.0.2
netmask 255.255.255.0
gateway 10.1.0.1
Set ip an address to the interfaces at host#3,
root@host3:~# vim /etc/network/interfaces
# The loopback network interface
auto lo
iface lo inet loopback
# The primary network interface
auto eth4
allow-hotplug eth4
iface eth4 inet static
address 172.16.1.2
netmask 255.255.255.0
gateway 172.16.1.1
Now if you ping from the host#2 to host#3 you will not get access cause our gateway server’s Ethernet ports aren’t listing to each others. To enable it we have to activate port forwarding.
So, Lets go to the host#1 again and Enable the port forwarding like below,
root@host1:~# vim /etc/sysctl.conf
net.ipv4.ip_forward=1
One last step, activate the port forwarding,
root@host1:~# sysctl -p
net.ipv4.ip_forward = 1
Now, if you ping from the host#2 to host#3 you will get reply.
root@host2:~# ping 172.16.1.2
PING 172.16.1.2 (172.16.1.2) 56(84) bytes of data.
64 bytes from 172.16.1.2: icmp_req=1 ttl=63 time=4.43 ms
64 bytes from 172.16.1.2: icmp_req=2 ttl=63 time=0.663 ms
64 bytes from 172.16.1.2: icmp_req=3 ttl=63 time=0.635 ms
^C
— 172.16.1.2 ping statistics —
3 packets transmitted, 3 received, 0% packet loss, time 2004ms
rtt min/avg/max/mdev = 0.635/1.910/4.432/1.783 ms
root@host3:~# ping 10.1.0.2
PING 10.1.0.2 (10.1.0.2) 56(84) bytes of data.
64 bytes from 10.1.0.2: icmp_req=1 ttl=63 time=0.663 ms
64 bytes from 10.1.0.2: icmp_req=2 ttl=63 time=0.586 ms
64 bytes from 10.1.0.2: icmp_req=3 ttl=63 time=0.604 ms
64 bytes from 10.1.0.2: icmp_req=4 ttl=63 time=0.641 ms
^C
— 10.1.0.2 ping statistics —
4 packets transmitted, 4 received, 0% packet loss, time 2999ms
rtt min/avg/max/mdev = 0.586/0.623/0.663/0.039 ms
Please note that we didn’t add any route at host#1 cause all the network is connected directly with host#1. That’s why we didn’t need to add a route, we have just enable port forwarding.
Hope this will document helps you to make a batter understanding. 😀
How to configure Quota on debian 7 wheezy
How to configure Quota on debian 7 wheezy
Topics: Quotas, Hard quota, Soft quota, Inode, Grace period, dump, tcpdump, Mount, Mount point
CONCEPT:
Generally we user two types of quota. One is based on folder/directory and the other one is based on the user/group.
. user & group quota
. folder quota
. quota with webmin
. warnquota
Configuration:
Please follow the below two configuration for the user/group and for folder quota. And follow the explanation at the end of the document.
Virtual Directory/Folder Quota
Now, If you do not with to quota on user or group basis you can use the Virtual Directory Quota. Linux does not permit quota on directory. That’s why we will create a virtual drive first and then we will quota on it. So, to make a quota on a directory without having to resort to quota software or manual usage checking, it utilizes Linux virtual filesystem support to do the trick. The following assumes we want a ~100MB quota on a directory.
1. Make a mount point. Here my mount point folder is /mnt/quotadir and mount point image is /mnt/quota.img. But you can set the location anywhere you want.
root@mail:~# mkdir -p /mnt/quotadir
2. Create an image file for the virtual file system. create a file full of /dev/zero, large enough to the maximum size you want to reserve for the virtual file-system.
root@mail:~# dd if=/dev/zero of=/mnt/quota.img bs=1024 count=100000
3. Format the drive. format this file with an ext3 file-system (you can format a disk space even if it is not a block device, but double check the syntax of every – dangerous – formatting command)
root@mail:~# mkfs.ext3 /mnt/quota.img
4. Mount the drive. mount the newly formatted disk space in the directory you’ve created as mount point, e.g.
root@mail:~# mount -o loop /mnt/quota.img /mnt/quotadir
or we can also done the job like the below way,
root@mail:~# mount -o loop,rw,usrquota,grpquota /mnt/quota.img /mnt/quotadir
As a result you now have a directory in /path/of/mount/point with a size limitation.
5. But this partition will be temporary. If you restart the server this partition will be removed. So, to make it a permanent patition add the fstab entry like the below way,
root@mail:~# vim /etc/fstab
# /etc/fstab: static file system information.
#
# Use ‘blkid’ to print the universally unique identifier for a
# device; this may be used with UUID= as a more robust way to name devices
# that works even if disks are added and removed. See fstab(5).
#
# <file system> <mount point> <type> <options> <dump> <pass>
proc /proc proc defaults 0 0
# / was on /dev/sda6 during installation
UUID=2dcfd294-49ae-4fcd-ad0f-6542d6f1db0b / ext3 errors=remount-ro 0 1
# /boot was on /dev/sda1 during installation
UUID=2307603e-b7a0-4d2f-a652-6f88893a5c98 /boot ext3 defaults 0 2
# swap was on /dev/sda5 during installation
UUID=bf5dacd2-cc26-419c-990b-74509168362c none swap sw 0 0
/dev/scd0 /media/cdrom0 udf,iso9660 user,noauto 0 0
/mnt/quota.img /mnt/quotadir ext3 loop 1 2
6. To check the entry use the following command,
root@mail:~# more /etc/mtab
# <file system> <mount point> <type> <options> <dump> <pass>
/dev/sda6 / ext3 rw,errors=remount-ro 0 0
tmpfs /lib/init/rw tmpfs rw,nosuid,mode=0755 0 0
proc /proc proc rw,noexec,nosuid,nodev 0 0
sysfs /sys sysfs rw,noexec,nosuid,nodev 0 0
udev /dev tmpfs rw,mode=0755 0 0
tmpfs /dev/shm tmpfs rw,nosuid,nodev 0 0
devpts /dev/pts devpts rw,noexec,nosuid,gid=5,mode=620 0 0
/dev/sda1 /boot ext3 rw 0 0
/dev/loop0 /mnt/quotadir ext3 rw 0 0
7. Now If you wish to add/reduce space from 100MB to 10MB on (trim the size of) the directory,
root@mail:~# umount /mnt/quotadir
root@mail:~# e2fsck -f /mnt/quota.img
root@mail:~# resize2fs -p /mnt/quota.img 10M
root@mail:~# mount -o loop /mnt/quota.img /mnt/quotadir
or we can also do the job like the below way,
root@mail:~# mount -o loop,rw,usrquota,grpquota /mnt/quota.img /mnt/quotadir
I also found a similar set of tools for reiserfs, couldn’t find a resize tool for jfs. In this solution the space gets eaten away (about 2MB) from the host partition(s), use with caution, be sure to save some space for future expansion.
user & group Quota
root@mail:~# apt-get install quota quotatool
root@mail:~# vim /etc/fstab
# <file system> <mount point> <type> <options> <dump> <pass>
proc /proc proc defaults 0 0
# / was on /dev/sda6 during installation
UUID=2dcfd294-49ae-4fcd-ad0f-6542d6f1db0b / ext3 errors=remount-ro,usrquota,grpquota 0 1
# /boot was on /dev/sda1 during installation
UUID=2307603e-b7a0-4d2f-a652-6f88893a5c98 /boot ext3 defaults 0 2
# swap was on /dev/sda5 during installation
UUID=bf5dacd2-cc26-419c-990b-74509168362c none swap sw 0 0
/dev/scd0 /media/cdrom0 udf,iso9660 user,noauto 0 0
Create The Partition Quota Configuration Files. The uppermost directory of the filesystem needs to have an aquota.user file (defines quotas by user) and an aquota.group file (defines quotas by group), or both. The man page for quota lists them at the bottom. In this case just enable per-user quotas for the /home filesystem.
create files quota.user and quota.group under root.
root@mail:~# touch quota.user quota.group
root@mail:~# chmod 600 quota*
root@mail:~# ls -l
total 4
drwx—— 2 root root 4096 May 4 10:58 mail
-rw——- 1 root root 0 May 5 19:44 quota.group
-rw——- 1 root root 0 May 5 19:44 quota.user
Editing the /etc/fstab file isn’t enough, Linux needs to reread the file to get its instructions for /home. You can do this using the mount command with the -o remount qualifier.
root@mail:~# mount -o remount /
root@mail:~# cat /etc/mtab
/dev/sda6 / ext3 rw,errors=remount-ro,usrquota,grpquota 0 0
tmpfs /lib/init/rw tmpfs rw,nosuid,mode=0755 0 0
proc /proc proc rw,noexec,nosuid,nodev 0 0
sysfs /sys sysfs rw,noexec,nosuid,nodev 0 0
udev /dev tmpfs rw,mode=0755 0 0
tmpfs /dev/shm tmpfs rw,nosuid,nodev 0 0
devpts /dev/pts devpts rw,noexec,nosuid,gid=5,mode=620 0 0
/dev/sda1 /boot ext3 rw 0 0
root@mail:~# quotacheck -mavug
Here,
m = don’t try to remount the file syatem
a = all file system in /etc/mtab
v = verbose, display extra information
u = only user quotas listed in /etc/mtab
g = only group quotas listed in /etc/mtab
root@mail:~# quotaon -avug
Here,
a = all file systems in /etc/fstab with quotas
v = verbose, display extra information
u = users, manipulate user quotas
g = groups, manipulate group quotas
root@mail:~# cd /home/mahidul
To set the soft limits to 4Mb and the hard limit to 5Mb for a user called mahidul you would run:
root@mail:~# quotatool -u mahidul -bq 4M -l ‘5 Mb’ /home
or
root@mail:/home/mahidul# edquota -u mahidul
GNU nano 2.2.4 File: /tmp//EdP.ayMEu4F
Disk quotas for user mahidul (uid 1000):
Filesystem blocks soft hard inodes soft hard
/dev/disk/by-uuid/2dcfd294-49ae-4fcd-ad0f-6542d6f1db0b 5096 4096 5096 6 0 0
Here,
blocks: 1k blocks
inodes: Number of entries in directory file
soft: Max number of blocks/inodes user may have on partition before warning is issued and grace persiod countdown begins.
If set to “0” (zero) then no limit is enforced.
hard: Max number of blocks/inodes user may have on partition.
If set to “0” (zero) then no limit is enforced.
If needed group quotas use below option,
root@mail:~# edquota -g group_name
Set grace period before enforcing soft limits for users,
root@mail:~# edquota -t
Grace period before enforcing soft limits for users:
Time units may be: days, hours, minutes, or seconds
Filesystem Block grace period Inode grace period
/dev/disk/by-uuid/2dcfd294-49ae-4fcd-ad0f-6542d6f1db0b 7days 7days
The system administrator can see what the disk and quota usage is like,
root@mail:~# repquota /
*** Report for user quotas on device /dev/disk/by-uuid/2dcfd294-49ae-4fcd-ad0f-6542d6f1db0b
Block grace time: 7days; Inode grace time: 7days
Block limits File limits
User used soft hard grace used soft hard grace
———————————————————————-
root — 683356 0 0 24790 0 0
man — 844 0 0 102 0 0
proxy — 35372 0 0 5437 0 0
www-data — 92 0 0 25 0 0
libuuid — 4 0 0 1 0 0
mahidul +- 5096 4096 5096 6days 6 0 0
test — 100 0 0 21 0 0
info — 80 0 0 18 0 0
soykot — 16 0 0 4 0 0
smmta — 52 0 0 10 0 0
smmsp — 8 0 0 2 0 0
messagebus — 4 0 0 1 0 0
root@mail:/home/mahidul# su – mahidul
Now, copy some files to test your quota,
mahidul@mail:~$ dd if=/dev/zero of=bigfile bs=1M count=3
3+0 records in
3+0 records out
3145728 bytes (3.1 MB) copied, 0.122912 s, 25.6 MB/s
mahidul@mail:~$ dd if=/dev/zero of=bigfile bs=1M count=4
sda6: warning, user block quota exceeded.
4+0 records in
4+0 records out
4194304 bytes (4.2 MB) copied, 0.153786 s, 27.3 MB/s
mahidul@mail:~$ dd if=/dev/zero of=bigfile bs=1M count=5
sda6: warning, user block quota exceeded.
sda6: write failed, user block limit reached.
dd: writing `bigfile’: Disk quota exceeded
5+0 records in
4+0 records out
5185536 bytes (5.2 MB) copied, 0.206898 s, 25.1 MB/s
Remember if we need, we can off the quota like this way,
root@mail:~# quotaoff -avug
Quota with webmin:
==================
mahidul@mahidul:~$ cp /etc/fstab /etc/fstab.orig
mahidul@mahidul:~$ sudo vim /etc/fstab
UUID=17ef55fd-bfb9-4052-a2a3-b6f960a2c6dd /home ext3 defaults,usrquota,grpquota,errors=remount-ro 0 1
mahidul@mahidul:~$ mount -o remount,usrquota /home
mahidul@mahidul:~$ mount | grep quota
mahidul@mahidul:~$ modprobe quota_v2 echo ‘quota_v2’ >> /etc/modules ###this line may not work but it will not cause any problem
#apt-get install quota quotatool
#touch /home/aquota.user
#touch /home/aquota.group
#chmod 600 /home/aquota.user /home/aquota.group
turn on quatacheck without rebooting:
# quotacheck -vagum
If your kernel supports journaled quota but you are not using it you’ll probably get an error. Use this command in that case:
# quotacheck -fvagum
Set limits for user:
#quotatool -u someusername -bq 100M -l ‘200 Mb’ /home
Check quotas:
#repquota /home
Webmin installation
===================
root@ns1:~# vim /etc/apt/sources.list
deb http://download.webmin.com/download/repository sarge contrib //add this line
root@ns1:~# cd /root
root@ns1:~# wget http://www.webmin.com/jcameron-key.asc
root@ns1:~# apt-key add jcameron-key.asc
root@ns1:~# apt-get update
root@ns1:~# apt-get install webmin
root@ns1:~# apt-get install quota quota-tools
You should now be able to login to Webmin at the URL http://localhost:10000/.
Or if accessing it remotely, https://your_ip_address:10000/.
If you get any dependency error install these (easy) dependencies:
Run this from a terminal. Expect some trouble from ‘libmd5-perl’.
root@ns1:~# sudo aptitude -y install perl libnet-ssleay-perl openssl libauthen-pam-perl libpam-runtime libio-pty-perl libmd5-perl apt-show-versions libapt-pkg-perl
Install the deprecated dependencies:
Download the libmd5-perl deb file and install it manually: Open a browser and get the newest libmd5-perl package (from 2004 – lol)
http://ftp.debian.org/pool/main/libm/libmd5-perl/. The likely package is named: libmd5-perl_2.03-1_all.deb
so we download it and install it:
root@ns1:~# wget http://ftp.debian.org/pool/main/libm/libmd5-perl/libmd5-perl_2.03-1_all.deb
root@ns1:~# sudo dpkg -i libmd5-perl_2.03-1_all.deb
Alternative way, you can also install webmin from deb file.
root@ns1:~# wget http://downloads.sourceforge.net/project/webadmin/webmin/1.510/webmin_1.510-2_all.deb
root@ns1:~# sudo dpkg -i webmin_1.510-2_all.deb
Open your web browser and enter the following address:
https://server_ip_address:10000/
Login user will be root and password will be root’s password.
Apply quota from wibmin:
Go to your browser https://mahidul:10000/
. Disk and Network file system > Use quotas : user and group > save
. System > Disk Quota > Edit user quota : mahidul > Edit quota on > Give the soft and hard limit here > Update
Apply warnquota: To Install webmin module for quotas
root@ns1:~# apt-get install webmin-quota
email warnings are triggered by warnquota
warnquota takes its configuration in /etc/warnquota.conf
warnquota is ran daily by default : /etc/cron.daily/quota
Here is my /etc/warnquota.conf
MAIL_CMD = “/usr/sbin/sendmail -t”
FROM = “your.address@your.domain.com”
SUBJECT = You have exceeded your quota
CC_TO = “your.address@your.domain.com”
SUPPORT = “support.address@your.domain.com”
PHONE = “01 02 03 04 05”
MESSAGE = “quota exceed for this user”
SIGNATURE = “Your signature”
Try dpkg-reconfigure -plow quota, it should ask you questions about warnquota configuration.
How to configure windows 7 VPN client to connect with a VPN server (l2tp+ipsec)
How to configure windows 7 VPN client to connect with a VPN server (l2tp+ipsec)
1. Set a new connection or network in Control Panel >> Network and Sharing Center.


1. Set a new connection or network in Control Panel >> Network and Sharing Center.

2. Select Connect to a workplace, and click Next

3. Select create a new connection, and click Next.

4. Select Use my Internet Connection.

5. Type the WAN IP address: 123.123.123.123 of the VPN server, Destination name: mahidulVPN and tick the Don’t connect now option, and click Next.
6. Type the Username and Password for L2TP VPN connection which you have to collect from thops, and click Create.

7. Please don’t click Connect Now, and click Close instead. 
8. Click Change adapter settings in Control Panel >> Network Sharing Center. 
9. Right click mahidulVPN Connection we created, and then select Properties.

10. Right click on “Option” tab and uncheck “Include windows logon domain”

11. Select Type of VPN as “Layer 2 Tunneling Protocol with IPSEC (L2TP/IPSec)” in the Security Tab, and then click Advanced Settings. 
12. Select Use pre-shared key for authentication, type the Key “**********“, and then click OK.
13. Right click “mahidulVPN” Connection, and select Connect.
14. Type the Username and Password, and click Connect. The Username and Password should be same as the ones on VPN server’s user Profile. 
15. L2TP over IPSec connection is now established. 😀
Note: After configuration please restart your pc before connect with VPN server. Without it sometimes an error pop up!!!
How to configure VPN with l2tp and ipsec using Mikrotik router
How to configure VPN with l2tp and ipsec using Mikrotik router:
For a long time in my life I have a fear with the name VPN. 😦 . In my absence mind I thought that VPN is some kinds of alien technology. :-D. I know you are laughing to know that. But when I understood them I was relief and also shameful that I was afraid of it. So, here I am going to share the concept and also the configuration of VPN server. Stick with me. 😀


For a long time in my life I have a fear with the name VPN. 😦 . In my absence mind I thought that VPN is some kinds of alien technology. :-D. I know you are laughing to know that. But when I understood them I was relief and also shameful that I was afraid of it. So, here I am going to share the concept and also the configuration of VPN server. Stick with me. 😀
Concept:
VPN means Virtual Private Network. Well what does that means? It means in VPN connectivity, when you connect your home pc to the office VPN server; your pc will get a local LAN ip from your office. So, though you are physically connect with different isp network but virtually your pc will act like a office LAN user.
Why we need VPN? Well suppose you have very valuable database/ information in your LAN those you don’t want to give access to the internet users. In that case you will need VPN. It allows you to connect your LAN from outer network by using a secure tunnel (using ipsec).
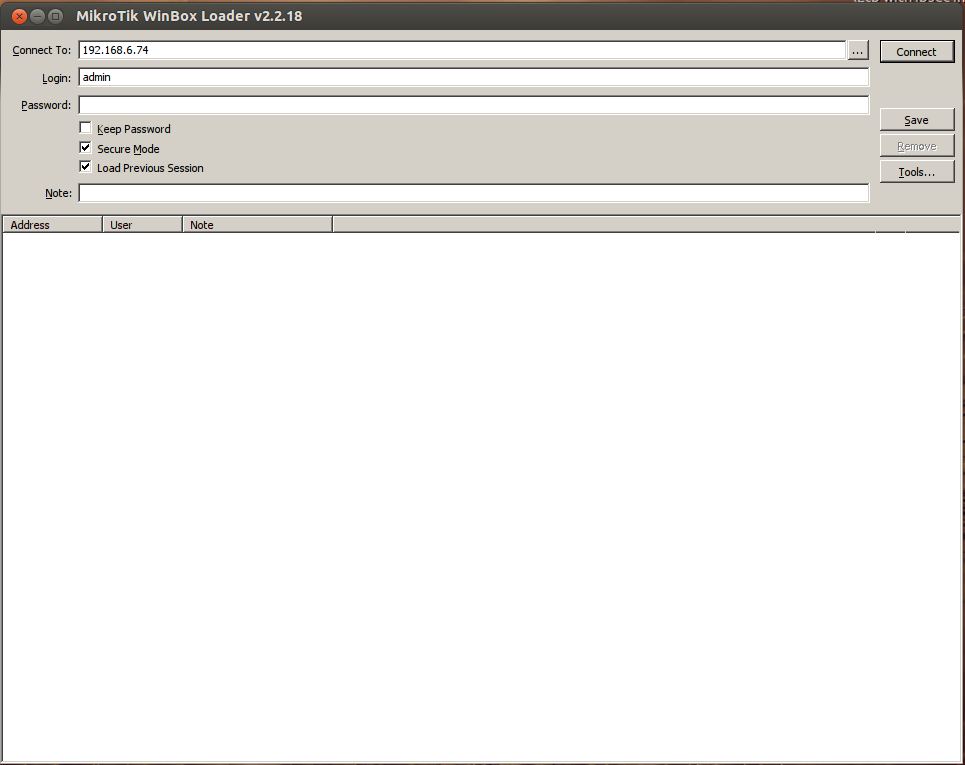
OK enough chit-chat. Lets get down to the business. To configure the VPN first connect with your Mikrotik router using Winbox (you may also use web browser if you prefer). Now, Go to the Connect to: Find the MAC address of your router if you didn’t set up an ip address yet.
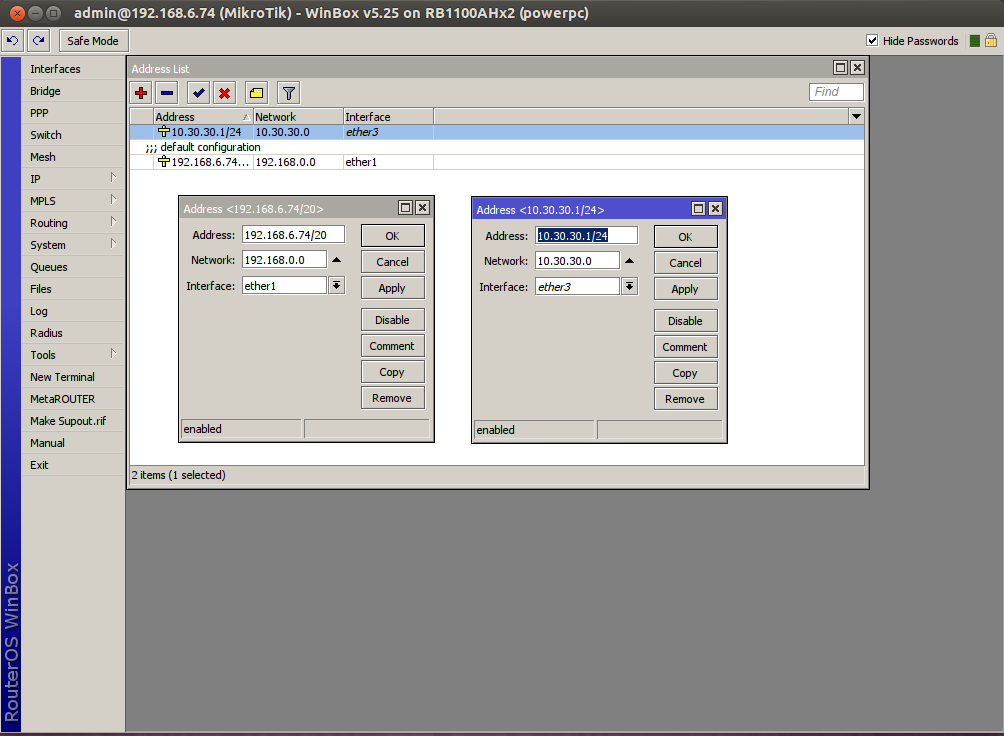
Now assign you ip address both WAN and LAN.
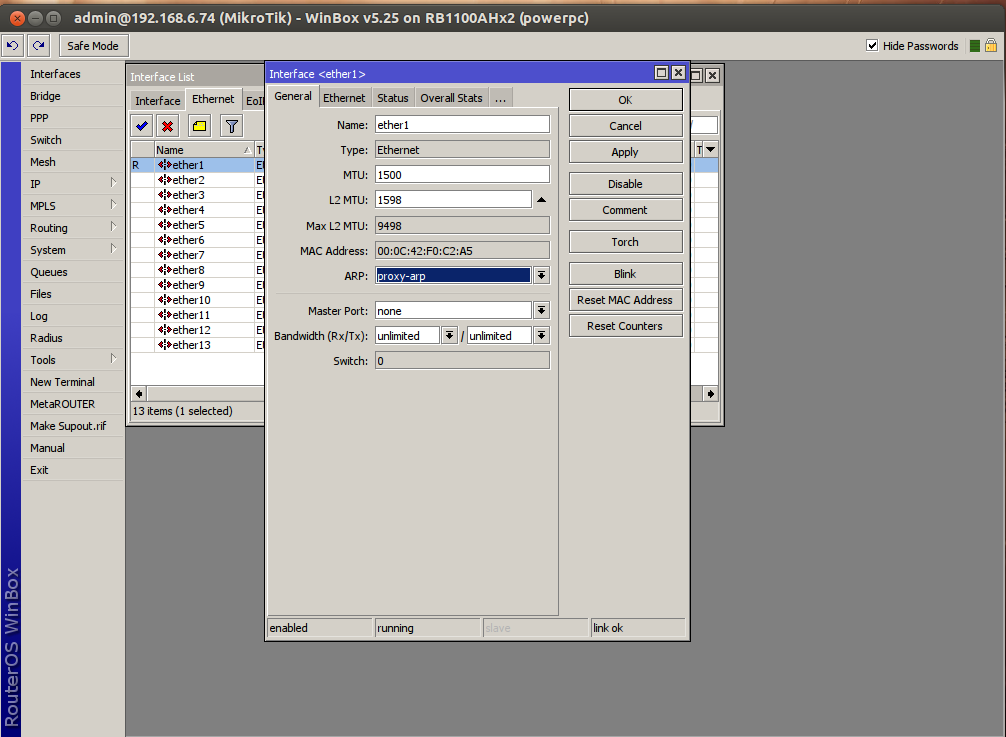
Go to Interface > Ethernet. Now select the WAN interface here mine is ether1.

Enable proxy-arp from ARP. Remember without it your users will be connected to VPN but they will be unable to access other machine.
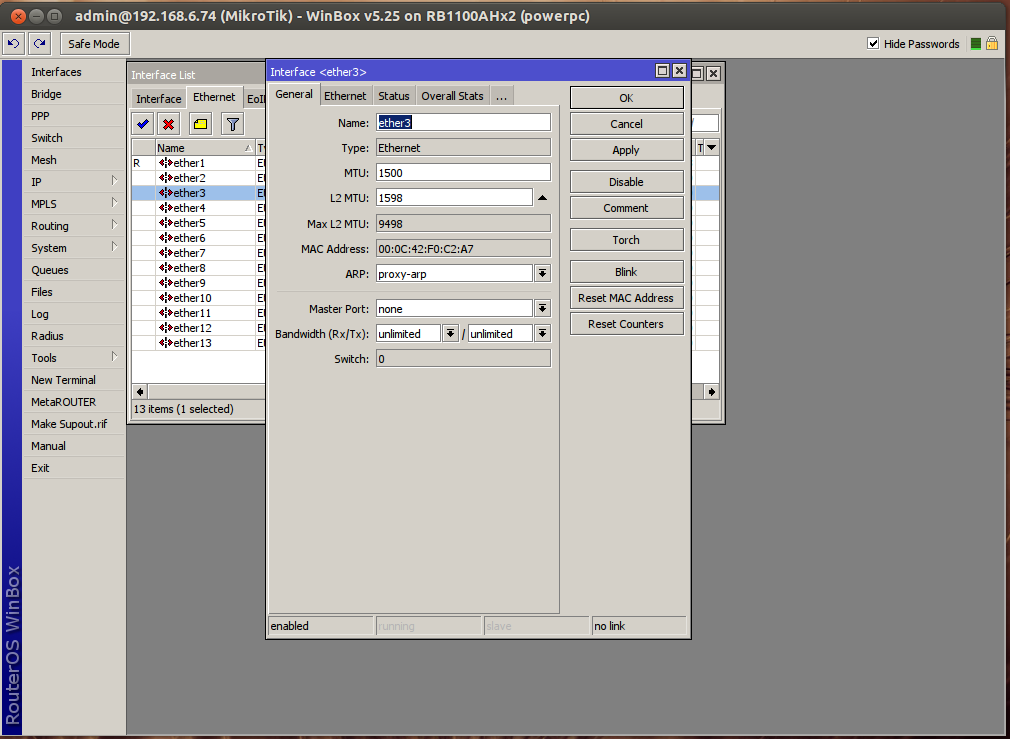
Repeat this procedure to your local LAN interface. Here mine is eth3.
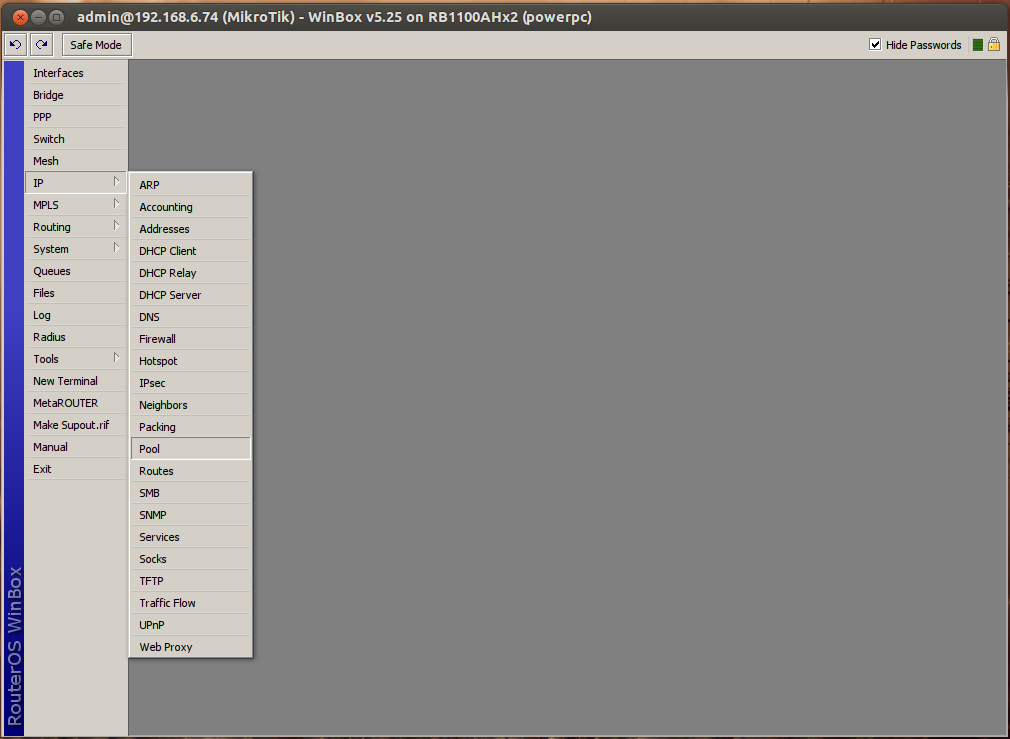
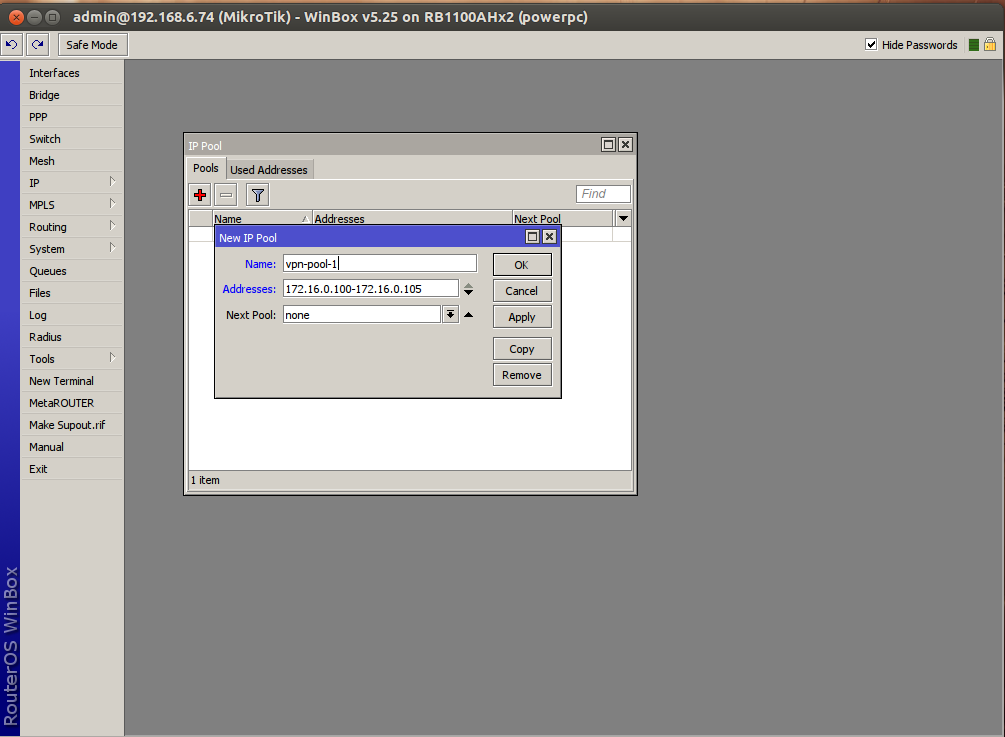
Now go to the ip > Pool
Pool Name: vpn-pool-1. Address 172.16.0.100-172.16.0.105. When vpn user will connect then they will get a ip address from this pool.
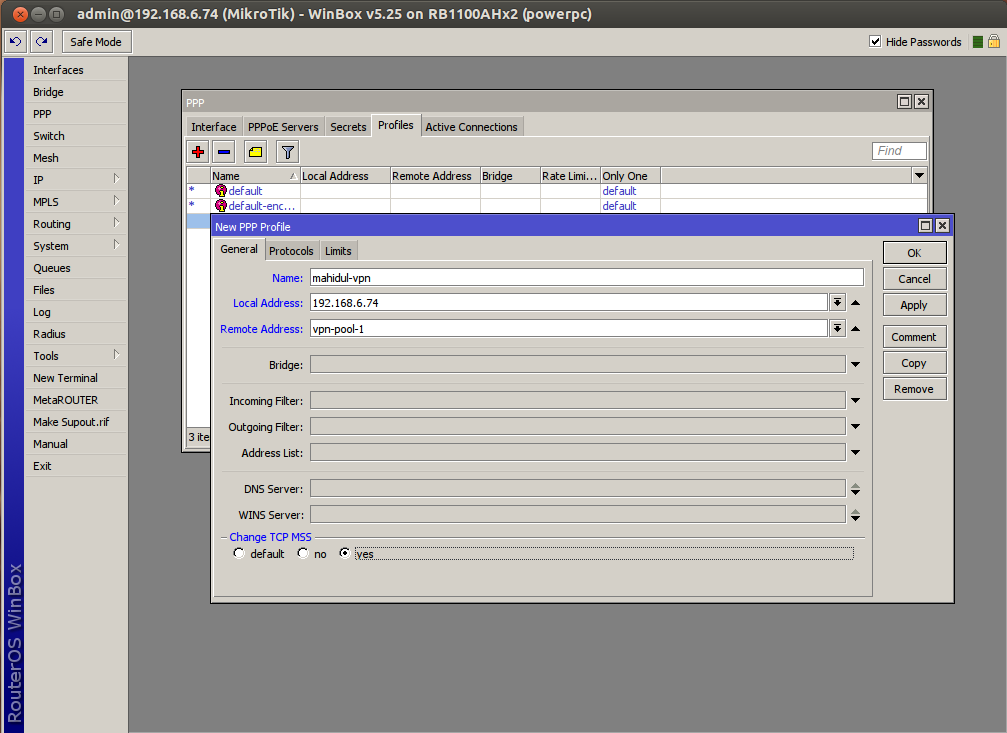
Now go to the PPP>Profile> Add a new profile. Name: mahidul-vpn . Local Address: internate ip. Remote address: vpn-pool-1. Change TCP MSS: yes
Lets create VPN users. PPP> Secret> Name: vpn-user1, Password:********, Service: l2tp, Profile: mahidul-vpn

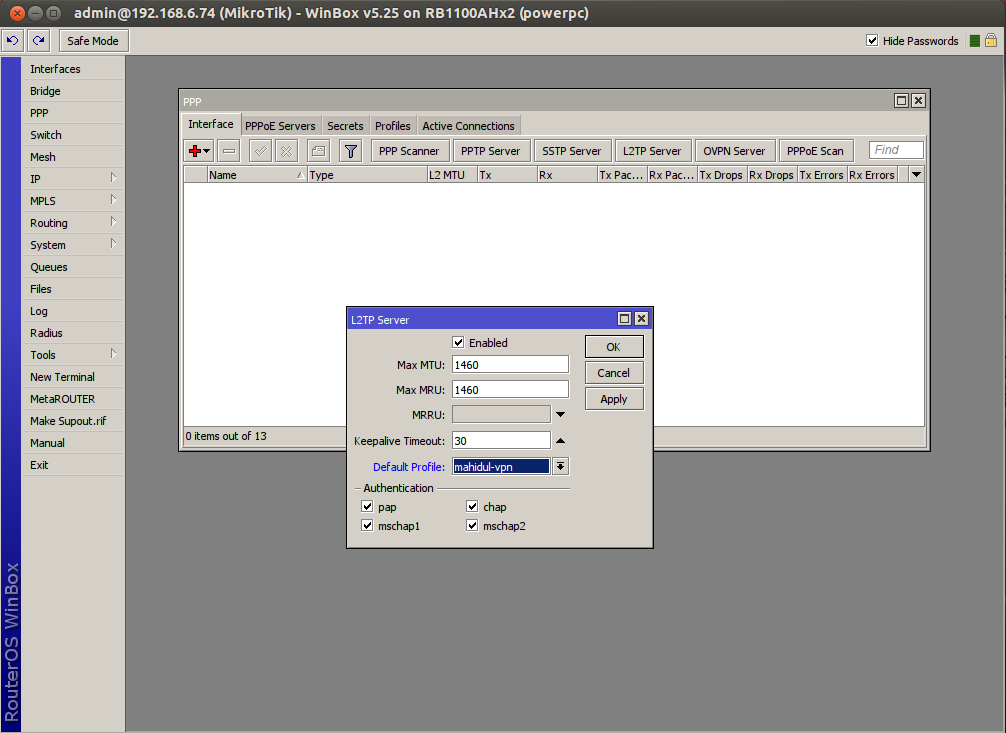
Now enable the l2tp service. Default profile: mahidul-vpn. Authentication: select all (MSCHAP2 for windows7)
OK great. We have just configured the l2tp tunnel. Now we will secure it with ipsec. Go to IP> Ipsec

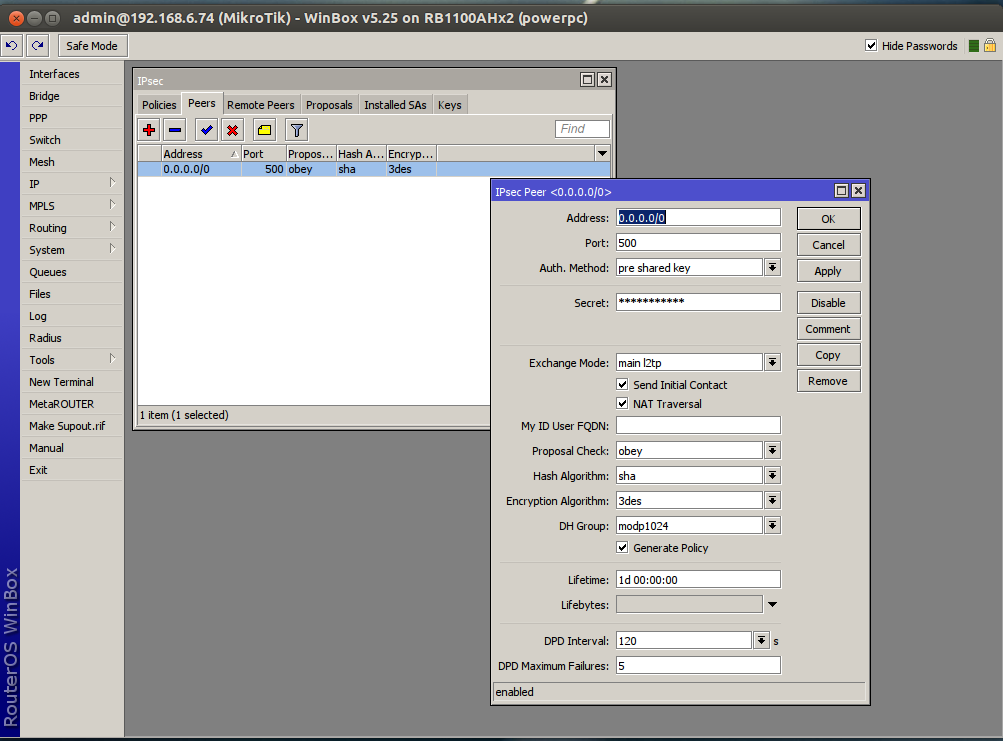
Now we will Create a pear. Go to IP> Ipsec> Peers> add
Address: 0.0.0.0/0
Port: 500
Auth. Method: pre shared key
Secret: give_a_password_which_will_need_the_user_to_connect_VPN
Exchange Mode: main l2tp
Send Initial Contact
NAT Traversal
Proposal Check: obey
Hash Algorithm: 3es
DH Group: modp1024
Generate Policy
And Last step create a proposal. Go to IP> Ipsec> Proposals> Click on default> check sha1, 3des, aes-256, PFS Group: none
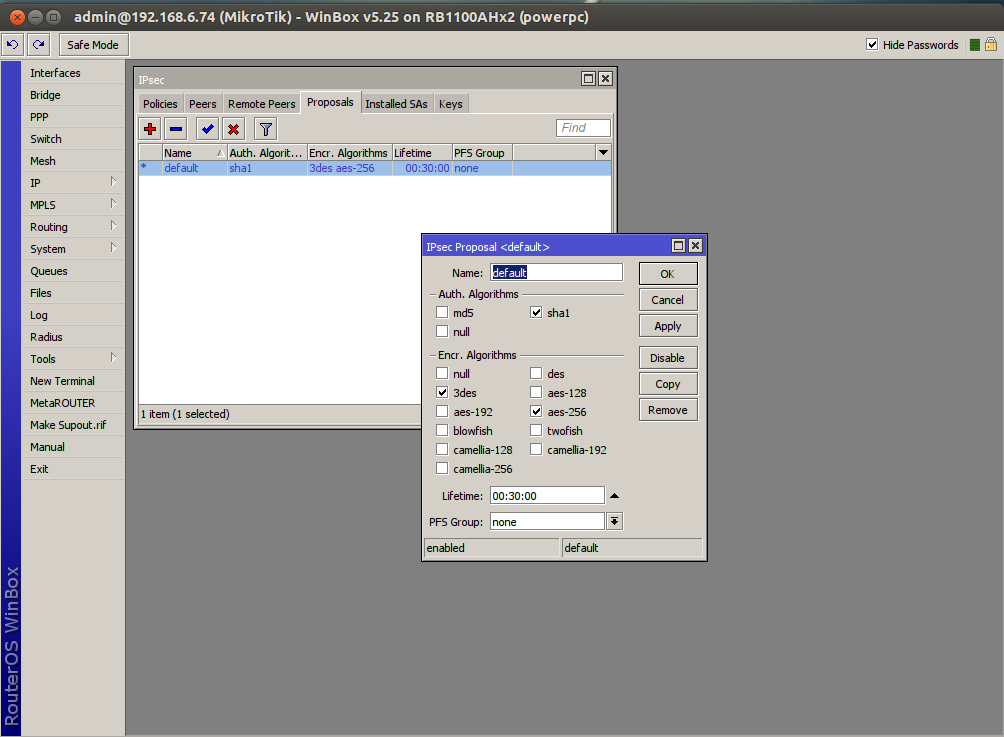
That’s all. Our VPN server with l2tp & ipsec is complete. Please follow the next blogs to check the VPN client configuration from Windows 7, Linux and MAC.
Very essential Debian commands
Very essential Debian commands
Update the debian package list:
root@mahidul:~root@mahidul:~# apt-get update
Upgrade your debian packages:
root@mahidul:~# apt-get upgrade
Upgrade debian to newer version,
root@mahidul:~# apt-get dist-upgrade
caution: this may also corrupt your system if you don’t have a deeper understanding in Linux don’t use it.
Setting the date and time:
root@mahidul:~# date ### check the date
root@mahidul:~# date –set 12:33:00 ### setting time
root@mahidul:~# date –set 05-05-2011 ### setting date
root@mahidul:~# hwclock –systohc ### sysncronizing
Or
root@mahidul:~# date
root@mahidul:~# date 041516022011
root@mahidul:~# hwclock –systohc
For Selecting time zone
root@mahidul:~# dpkg-reconfigure tzdata
For showing Debian version:
root@mahidul:~# more /etc/issue
DNS show up:
root@mahidul:~# vim /etc/resolv.conf
Change the host and domain name:
root@mahidul:~# vim /etc/hosts
root@mahidul:~# vim /etc/hostname
root@mahidul:~# cp /etc/hosts /var/spool/postfix/etc/
root@mahidul:~# vim /etc/postfix/transport
root@mahidul:~# vim /etc/postfix/main.cf
Creating a user account:
root@mahidul:~# adduser username
root@mahidul:~# passwd yourpassword
If you want to give a dot (.) like user.name then,
root@mahidul:~# adduser –force-badname user.name (For forcefully write)
Or, you can first add a user then add dot (.) the below files.
root@mahidul:~# vim /etc/passwd
user.name (add a dot(.) between bolcorpbd)
root@mahidul:~# vim /etc/shadow
user.name (add a dot(.) between bolcorpbd)
root@mahidul:~# vim /etc/groups
user.name (add a dot(.) between bolcorpbd)
Changing password:
root@mahidul:~# passwd username
root@mahidul:~# new password: (your new password)
root@mahidul:~# re-type password: (your new password)
Delete user with directory:
root@mahidul:~# userdel bolcorp
root@mahidul:~# rm -rf bolcorp
Delete only user:
root@mahidul:~# deluser bolcorp Or userdel bolcorp Or rm-rf bolcorp.bd
For creating IP forwarding:
root@mahidul:~# Vim /etc/sysctl.conf
Net.ipv4.ip_forward = 1 (UNCOMMENT THE FOLLOWING LINE)
For IP forwarding checking:
root@mahidul:~# Sysctl -p
Cache delete from squid:
root@mahidul:~# cd /var/spool/squid
root@mahidul:~# ls
root@mahidul:~# rm –rf*
If configuration is ok but still can not browse then
root@mahidul:~# cd /var/spool/squid/
root@mahidul:~# rm -rf swap.state
root@mahidul:~# rm -rf swap.state.last-clean
root@mahidul:~# /etc/init.d/squid restart
Checking squid status:
root@mahidul:~# pgrep squid
2271 }
2274 } than squid process is ok
then check cache.log for checking errors,
root@mahidul:~# tail -f /var/log/squid/cache.log
This is how you will get the log report with date/time format.
root@mahidul:~# tail -f /var/log/squid/access.log | perl -pe ‘s/[\d\.]+/localtime($&)/e’
root@mahidul:~# grep 192.168.0.14 /var/log/squid/access.log | perl -pe ‘s/[\d\.]+/localtime($&)/e’
To close a running process: (List the details of a single process)
root@mahidul:~# ps aux | grep dansguardian
root@mahidul:~# pkill-9 dansguardian
For showing mail send /Receive:
root@mahidul:~# tail –f/var/log/mail.log
root@mahidul:~# Mlog
To Show client bandwidth for particular user PC:
root@mahidul:~# ifconfig (to see what type LAN are using such as wth0,eth1)
root@mahidul:~# if top –I eth1
Mail Sending via telnet:
root@mahidul:~# telnet localhot 25
Telnetlocalhost trying 127.0.0.1…
Connected to localhost.localdomain(127.0.0.1)
Escape character is`^`]:
220 mail.ocl-bd.com ESMTP Postfix(2.2.2)
Helo sam
250 mail.ocl-bd.com
Mail from:sam@ocl-bd.com
250 OK
Rcpt to:anamul@bol-online.com
250 Ok
Data
354 End data with <CR><LF><CR><LF>
Test mail
.
250 Ok: queued as 57DFF2884C9
Quit
Mail Box size check:
root@mahidul:~# cd /var/spool/mail
root@mahidul:~# ls –alh
root@mahidul:~# cd /var/mail
Mail box details:
root@mahidul:~# alpine –f /var/spool/mail/username
root@mahidul:~# pine –f /var/spool/mail/username
root@mahidul:~# GetMail username
For showing Particular mail account:
root@mahidul:~# grep corp@vashi.com /var/log/mail.log
For check previous mail:
root@mahidul:~# ped
root@mahidul:~# ls
root@mahidul:~# grep “from <”masud@online.com”>” mail.log
Aliasing in Group:
root@mahidul:~# vim /etc/postfix/aliases
#See man 5 aliases for format
postmaster: root
#groupname: username1,username2
toall: mahidul,test,info
root@mahidul:~# postalias aliases
root@mahidul:~# /etc/init.d/postfix restart
Auto Replay (vacation mail) of the account:
root@mahidul:~# cd /home
root@mahidul:~# ls
root@mahidul:~# cd username
root@mahidul:~# vim message
root@mahidul:~# message paste (place user massage and save the file using ESC+SHIFT+:)
root@mahidul:~# ls -alh
root@mahidul:~# mv forward .forward
root@mahidul:~# mv procmailrc .procmailrc
If Auto Replay is not configured :
root@mahidul:~# apt-get install procmail (press enter)
root@mahidul:~# cd /home/(username) press enter
root@mahidul:~# ls -al press enter
root@mahidul:~# vim .procmailrc
###Now write these script,
#SHELL=/bin/sh
#MAILDIR=$HOME/Mail
#DEFAULT=/var/spool/mail/rafii.zaman
#LOGFILE=$MAILDIR/from
#LOGFILE=/var/log/procmail.log
#LOCKFILE=$HOME/.lockmail
# Anything that has not been delivered by now will go to $DEFAULT
# using LOCKFILE=$DEFAULT$LOCKEXT
#:0 h c
# * !^FROM_DAEMON
# * !^X-Loop: rafii.zaman@dzvilo.com
# | (formail -r -I”Precedence: auto-reply”
# -A”X-Loop: rafii.zaman@dzvilo.com” ;
# cat $HOME/message; \
# ) | $SENDMAIL -oi .t
SHELL=/bin/sh
:0 h c
* !^FROM_DAEMON
* !^X-Loop: rafii.zaman@dzvilo.com
| (formail -r -I”Precedence:junk” \
-A”X-Loop: rafii.zaman@dzvilo.com” ; \
cat $HOME/message; \
) | $SENDMAIL -oi -t
:0
###Then save the file.
root@mahidul:~# vim .forward (press enter)
|/usr/bin/procmail (write the following path)
root@mahidul:~# vim message (press enter)
write down the message which will be Auto replied then save the file.
Removing Auto Replay to an email account:
root@mahidul:~# cd /home/
root@mahidul:~# ls -alh
root@mahidul:~# cd username
root@mahidul:~# mv .forward forward
root@mahidul:~# mv .procmailrc procmailrc
Spam Whitelist user ID: (To show free spam mail)
root@mahidul:~# vim /etc/MailScanner/rules/spam.whitelist.rules
root@mahidul:~# /etc/init.d/openprotect restart
Spam whitelist:
root@mahidul:~# vim /opt/MailScanner-4.82.6-1/etc/rules/spam.whitelist.rules
Spam Site list:
root@mahidul:~# vim /opt/MailScanner/etc/spam.lists.conf
###Add you spam white list here.
# This is where you can build a Spam WhiteList
# Addresses matching in here, with the value
# “yes” will never be marked as spam.
#From: 152.78. yes
#From: 130.246. yes
FromOrTo: yahoo.cn yes
FromOrTo: hpchuazhong.com yes
FromOrTo: sgdgroup.com yes
FromOrTo: tientuan.com.vn yes
FromOrTo: buznan@ifotam.com.pl Yes
FromOrTo: default no
If SMTP not working / Mail not sending:
root@mahidul:~# Ps –ef | grep dovecot (To show dovecot running / not)
root@mahidul:~# /etc/init.d/dovecot stop
root@mahidul:~# /etc/init.d/dovecot start
root@mahidul:~# telnet clint IP 25 (first check client side)
Check local connection ok?
root@mahidul:~# mii-tool
root@mahidul:~# arp –n
root@mahidul:~# tail –f /var/log/squid/access.log
Uninstall a package:
root@mahidul:~# apt-get –purge remove packagename
Client side :
root@mahidul:~# telnet clientip 25
Show Mail queue:
root@mahidul:~# mailq
Mail queue flash :
root@mahidul:~# postfix flash
or
root@mahidul:~# postfix -f
you will list all of the mails which are queued or simply timed out for some reason. If you want to remove a mail from the “mailq” type:
root@mahidul:~# postsuper -d mailID
To remove all mail from the queue:
root@mahidul:~# postsuper -d ALL
Sometime mailscaner holds the mail in que but could not flush then you have to reque the mails like this way:
root@mahidul:~# postsuper -r ALL
To remove all mails in the deferred queue:
root@mahidul:~# postsuper -d ALL deferred
Copy from another server:
root@mahidul:~# scp MailScanner-install-4.82.6-1.tar.gz 202.161.190.238:/home/mahfuj/
Copy Files from one server(A) to other(B) (While logged into A):
root@mahidul:~# scp –p 78 FILENAME USERNAME@ADDRESS_OF_REMOTE_SERVER:FILENAME
For example:
root@mahidul:~# scp /home/jlwallen/sample.pdf jlwallen@192.168.1.2:/home/jlwallen/sample.pdf
Copy Directory: from A to B(While logged into A):
root@mahidul:~# scp –r –p78 /home/jlwallen/TEMP jlwallen@192.168.1.2:/home/jlwallen/TEMP
Show all processes:
root@mahidul:~# ps aux //similar to ps ux but it would show the process of every user as well as the system.
which will print out something like:
113 2596 0.0 0.5 17852 11460 ? Ss 06:49 0:00 /usr/sbin/dansguardian
Now we can see the PID of Dansguardian is 2596. We can kill this with the kill 2956 command.
Web browsing package:
root@mahidul:~# apt-get install lynx
root@mahidul:~# lynx http://www.yahoo.com // use lynx command to browse
Find out a installed package:
root@mahidul:~# whereis filename
root@mahidul:~# find filename
root@mahidul:~# finger filename
Show folder Size:
root@mahidul:~# du -h
Show pertition Details:
root@mahidul:~# df -h
Format command in linux:
root@mahidul:~# sudo mkfs -t ext3 /dev/hda1
Search a file:
root@mahidul:~# find /-name testfile
Find a new connected device:
root@mahidul:~# fdisk -l
How to install and configure Debian 7 wheezy
How to install and configure Debian 7 wheezy
I know for a new beginner Linux installation is not easy. Specially if you come from windows background. In Linux you need to understand some basic info regarding partitioning and Linux data structure for going forward. But don’t worry everyone has started from zero. So, If you are a new bee in Linux, don’t worry at all. Guys like us always here to help at your journey to the Linux world. 😀
Introduction:
In this document I have used the following settings as an example:
Real IP : 123.123.123.123
Subnet mask : 255.255.255.224
Gateway : 123.123.123.121
Local IP : 192.168.0.1
Local Network : 192.168.0.0/24, 192.168.1.0/24
Domain name : mahidul.com
So lets get start with Debian wheezy Installation. First put the Debian wheezy disk to the DVD drive. Then when a massage come about press any key. Then type any key from the keyboard. Then follow the bellow foot steps-
Language : English
Country : Other > Asia > Bangladesh
Keymap to use : American English
IP address : 123.123.123.123
Netmask : 255.255.255.224
Gateway : 123.123.123.121
Name server address : 8.8.8.8 8.8.4.4
Domain name : mahidul.com
Host name : mail
Root password : give_your_password
Root password validity : give_your_password
Full name for new user : Mr. User Name
User name to the account : username
Choose a password : give_your_password
Scan another cd/ dvd : no
Use network mirror : no
Partitioning method : Guided use entire disk.
Select disk to partition : SCSI1 (0,0,0) (sda)-11.2 GB Hard disk drive
Partitioing Scheme : All file in one partition
Partition for linux OS Debian. Keep 250 MB for boot and blootable flag shuld be on. Then make a partition of the double the size of your RAM and assign it as SWAP partition. Rest of the space keep as root(/).
Primary /boot – 256mb – Bootable Flag ON
Primary swap – 2 X Ram – Bootable Flag OFF
Primary / – Rest of HDD – Bootable Flag OFF
Finish partitioning and write changes to the disk: yes
Participate into popular uses survey : no
Chose software to install : standard system
Workgroup / domain name : mahidul.com
Modify smb.conf to us wins : no
Install the GRUB boot loader to the master boot: yes
Install the GRUB2 boot loader to the master boot: no
Choose software to install : Do not select any software from here.
Finish the installation and reboot the server. Now let assign network ip address so that we get Internet connectivity.
First update source list:
root@mail:~# nano /etc/apt/sources.list
deb http://ftp.us.debian.org/debian wheezy main
deb http://security.debian.org/debian-security squeeze/updates main
deb http://security.debian.org/ squeeze/updates main contrib non-free
deb-src http://security.debian.org/ squeeze/updates main
Then setup ip address to the NIC card:
root@mail:~# nano /etc/network/interfaces
# The loopback network interface
auto lo
iface lo inet loopback
# The primary network interface
allow-hotplug eth0
auto eth0
iface eth0 inet static
address 123.123.123.123
netmask 255.255.255.224
network 123.123.123.64
broadcast 123.123.123.95
gateway 123.123.123.65
# dns-* options are implemented by the resolvconf package, if installed
dns-nameservers 8.8.8.8 8.8.4.4
dns-search mahidul.com
allow-hotplug eth1
auto eth1
iface eth1 inet static
address 192.168.0.1
netmask 255.255.255.0
#This configuration divided eth1 into 2 logical port to support 2 network using 1 port. Genarelly you dont need the bellow configuration.
#allow-hotplug eth1:0
#auto eth1:0
#iface eth1:0 inet static
# address 192.168.1.254
# netmask 255.255.255.0
Restart the network interface.
root@mail:~# /etc/init.d/networking restart
Update your DNS address. It may be your own dns or may be your isp dns.
root@mail:~# vim /etc/resolv.conf
dns-name servers 8.8.8.8 8.8.4.4
Set the host name for the machine:
root@mail:~# vim /etc/hosts
123.123.123.123 mail.mahidul.com mail
root@mail:~# vim /etc/hostname
mail
Now update the source list and upgrade your all software packages.
root@mail:~# apt-get update
root@mail:~# apt-get upgrade
root@mail:~# vim /etc/passwd
: %s/bin\ /sh/bin\ /false/g
Set the date:
root@mail:~# date
root@mail:~# date –set 12:33:00
root@mail:~# date –set 04-05-2011
root@mail:~# hwclock –systohc
Enable data transfer between the NIC cards. I mean enable packet forwarding:
root@mail:~# vim /etc/sysctl.conf
# Uncomment the next line to enable packet forwarding for IPv4
net.ipv4.ip_forward=1
Install some very important softwares:
root@mail:~# apt-get install vim iftop telnet alpine traceroute lynx -y
root@mail:~# apt-get install rcconf
root@mail:~# rcconf
# then selects the iptables option from here to start automatically every time after restart.
Install some dependencies:
root@mail:~# apt-get install gcc g++ make
Install and configure ssh for remote login:
root@mail:~# apt-get install ssh
root@mail:~# vim /etc/ssh/sshd_config
Port 78
Permit_Root_Login: no
root@mail:~# /etc/init.d/ssh restart
That’s all for a start. 😀 Pretty easy! Isn’t it!!!!
